I’ve had an alarm clock/radio on my nightstand FOREVER! I had one as a kid and as I’ve grown up, I’ve always continued to keep one next to my bed. At first, I actually used it as an alarm but as technology changed, I started using my phone as my alarm. So of course, I then upgraded my clock/radio to include an iPhone charging station. Recently, though, the charging portion broke and I was then left with just a clock/radio. What? When was the last time I even used it as a clock/radio? Really, all I need is a spot to charge my iPhone and since it will be on my nightstand, it might as well look good, right? I was then on the hunt for the perfect charger!
I came across these vintage book chargers on Anthropologie’s website. Love these but don’t love the $68 price tag!

Instead, I decided to make my own. Here’s what I did:
Materials Needed:
- 2 Hardcover Books
- iPhone charging cord
- Craft knife
- Glue
Instructions:
1. Find a Book: I bought a used hardcover book on sale for $2.17. I could have used a book I already had, but since I’d be destroying the book and because I wanted it to match the decor of my bedroom, I decided it was better to buy a used book. Remember that the color of the dust jacket doesn’t matter since you’ll be removing this to expose the hardcover below.

2. Measure: Please the head of the plug on the book and trace around it. This is a bit tricky because of the cord, which doesn’t allow you to place it flat on the book’s surface. I choose to put the metal side of the plug on the book and then eyeball the dimensions of the plastic part. My advise is to not place your plug too close to the edge of the book; otherwise, as you’re cutting (especially for the cord channel), you’ll wind up ripping some of the pages and exposing the cord through the side of the book.
3. Cut the Cover: Once you have your plug outlined, it’s time to cut through the cover of the book. I used a craft knife (X-Acto knife) to make my cuts. I used several small, smooth cuts until I finally made it through the thickness of the book’s cover. Once the hole is made, push your plug through from the back to the front to ensure that the hole is big enough and that you have a snug fit.
4. Cut the Pages: Once you have your hole in the cover, start to cut through the pages below. You’ll need to cut down far enough to accommodate the entire depth of the plug head plus the bend in the cord. If you don’t cut down far enough, your plug will sit up high on your book and won’t look as clean as it otherwise could. Also, I would advise that you cut at a slight angle so that they plug can sit angled slightly back for a better fit on the charger.
5. Cut a Cord Channel: Once you have cut a space for the plug, you’ll then need to cut out a channel for the cord to run to the back of the book (so that you can plug into the wall). Again, make sure it’s deep enough into the book so that the cord doesn’t keep the book from closing all the way.
6. Put in Place and Glue: When all of your channels and cuts are made, feed the plug through the book up through the cover. You’ll need just a bit of the white plastic head to protrude from the book’s cover in order to ensure a full connection between your phone and the plug. Once in place and you’ve tested to ensure that it works, glue the plug in place. For this, I chose to use my hot glue gun because it’s what I had readily available, although any glue appropriate for plastic should work. This step is important, though, otherwise, when you try to remove your phone from the charger, you’ll pull the plug out through the cover.
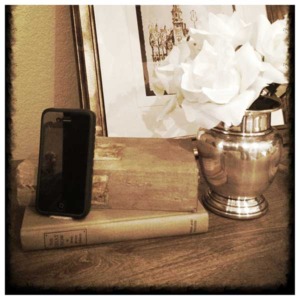
Ta-da! You’re done! I chose to put the charger on the bottom book I was using so that I could use the top book for added stability of the phone. Also, my top book isn’t actually a book at all but rather a book box that I always keep on my nightstand to hold the little mementos my kids bring my (i.e. magic rocks, flowers, gemstones).


Join the Community
Let’s keep in touch! Get exclusive artwork plus the latest news delivered directly to your Inbox!
Absolutely beautiful! Yours looks much nicer than the $68 one that’s for sure!!